How to DIY Ripped Leggings: Tips and Step-by-Step Guide
by Susan T.
Learning how to DIY ripped leggings is easier than you think — all you need is a pair of old leggings, sharp scissors, and about 20 minutes. Whether you want a subtle peek-a-boo slit for your next yoga class or a bold, shredded street-style look, this guide walks you through every cut. If you're not sure whether to start with leggings or yoga pants, check out our breakdown of yoga pants vs. leggings to pick the right base pair for your project.
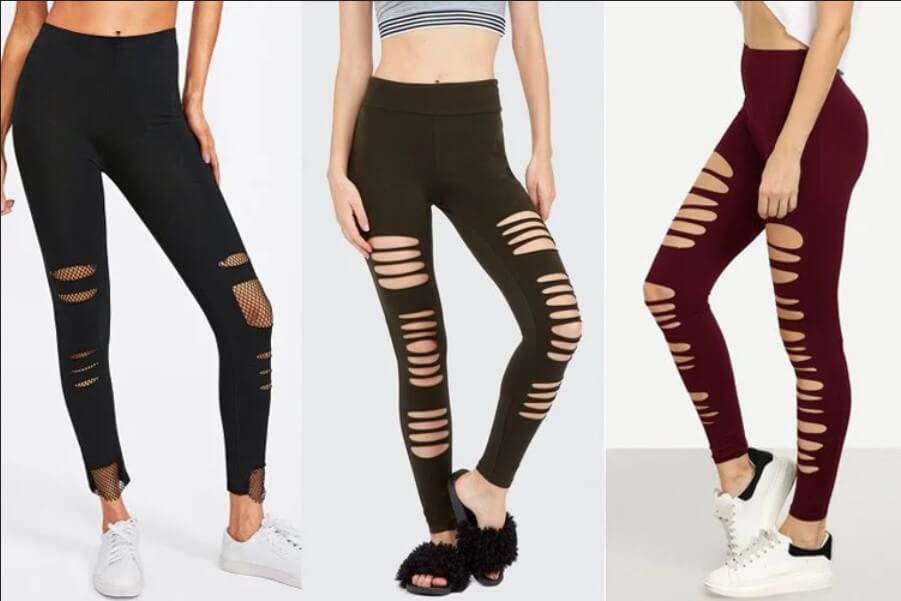
Ripped leggings have become a staple in yoga studios, dance classes, and casual athleisure outfits. The distressed look adds personality to your workout wardrobe without spending money on designer pairs that come pre-ripped. Plus, it's a great way to breathe new life into leggings that already have a small hole or snag.
In this guide, you'll get a full step-by-step tutorial, tips for different skill levels, a troubleshooting section for common mistakes, and best practices to make your ripped leggings last. Let's grab those scissors.
Contents
When Ripped Leggings Work (and When They Don't)
Ripped leggings aren't right for every situation. Before you start cutting, think about where and how you plan to wear them. The wrong fabric or placement can turn a trendy DIY project into an unwearable mess.
Great Occasions for Ripped Leggings
- Casual yoga sessions — gentle flow, restorative, or home practice where you want to express your style
- Dance and barre classes where movement shows off the cutouts
- Running errands, brunch, and everyday athleisure wear
- Festival outfits layered over colorful tights or fishnets
- Upcycling leggings that already have holes, snags, or pilling
When to Skip the Scissors
- Hot yoga or intense sweat sessions — exposed skin sticks to the mat and makes poses uncomfortable
- Compression leggings you rely on for muscle support during recovery
- Brand-new premium leggings (rip an older pair first to practice)
- Professional or workplace settings, even if your office is athleisure-friendly
- Leggings made from very thin or sheer fabric — rips will spread uncontrollably
A good rule of thumb: if the leggings have at least 15% spandex (elastane) content, the fabric will hold its shape around cuts without fraying too much. Cotton-heavy blends fray faster and may not give you clean lines.
How to DIY Ripped Leggings: Step-by-Step Tutorial
This is the core of the project. Follow these steps carefully your first time, and you'll have a pair of custom ripped leggings in under 30 minutes.
What You'll Need
| Item | Purpose | Alternative |
|---|---|---|
| Sharp fabric scissors | Clean cuts without snagging | Rotary cutter with mat |
| Chalk or washable marker | Mark cut lines | Soap sliver or painter's tape |
| Cardboard insert | Prevents cutting through both layers | Magazine or cutting board |
| Ruler or measuring tape | Even spacing between slits | Phone screen as straight edge |
| Safety pins | Temporary holds for braided styles | Binder clips |
| Clear nail polish or fray check | Seals edges to prevent spreading | Fabric glue |
Creating Basic Slits
- Put the leggings on and mark your zones. Wear the leggings and use chalk to mark where you want the rips. Common spots: front thighs, knees, and calves. Avoid the inner thigh and waistband — cuts there compromise fit and stretch.
- Take the leggings off and lay them flat on a hard surface.
- Slide a piece of cardboard inside one leg so you only cut through the front layer.
- Use your ruler to draw horizontal lines where you want each slit. Space them 1 to 1.5 inches apart for a classic look.
- Cut along each line with sharp scissors. Make each slit 2–4 inches wide. Shorter slits look subtle; longer ones show more skin.
- Gently stretch each cut horizontally with your fingers. This curls the fabric edges and gives that signature rolled-rip look.
- Apply a tiny dot of clear nail polish or fray check to each end of every slit to stop them from spreading during wash and wear.
- Repeat on the other leg, using your first leg as a visual guide for symmetry.
Pro tip: Always cut less than you think you need. You can widen a slit later, but you can't undo an oversized cut. Start with 2-inch slits and stretch them to test the look before going bigger.
Creating a Braided or Woven Look
The braided style takes basic slits to the next level. It's the technique you see all over yoga studio Instagram feeds.
- Follow steps 1–5 above, but make your slits closer together — about 0.75 inches apart.
- Starting from the top, take the first strip of fabric and twist it once.
- Loop it over the strip below it, creating an interlocking chain.
- Continue down the leg, twisting and looping each strip over the next.
- Pin the bottom strip in place with a safety pin while you check your work.
- Secure the last strip by tucking it under and using a small stitch or fabric glue to hold it.
This method works best with thicker fabrics like nylon-spandex blends. Thin cotton strips tear easily under tension. For more on fabric types, our guide on nylon vs. polyester leggings breaks down the pros and cons of each material.
Beginner vs. Advanced Ripping Techniques
Your skill level and comfort with scissors should guide which technique you choose. Here's how they compare.
Beginner-Friendly Cuts
- Single knee slit — one horizontal cut across each knee. Minimal risk, maximum style impact.
- Back-of-calf cutout — a small oval or diamond shape on the lower calf. Easy to do and visible during downward dog.
- Side seam peek — cut a 3-inch slit along the outer side seam below the knee. The seam reinforcement prevents spreading.
If this is your first time, start with one of these. You'll build confidence and learn how your specific fabric reacts to cuts.
Advanced Distressing Methods
- Full-leg ladder — 8–12 horizontal slits from mid-thigh to ankle, evenly spaced. Requires patience and precision.
- Asymmetric design — different patterns on each leg. One braided, one with scattered slits.
- Layered cutouts — wear ripped leggings over a contrasting pair (mesh, printed, or neon) so the under-layer shows through.
- Geometric shapes — triangles, diamonds, or zigzag patterns cut with a rotary cutter and template.

Advanced techniques take 45–60 minutes per pair. Practice on a cheap pair from a thrift store before touching your favorites.
Quick Wins for an Instant Upgrade
Not ready for a full ripping project? These small tweaks take less than five minutes and still give your leggings a fresh, customized look.
- Single accent slit. One cut on the outer thigh of each leg. Subtle but noticeable during warrior poses.
- Ankle vents. Two small vertical cuts at the ankle hem. Helps with airflow and adds visual interest.
- Waistband fold-over. Fold the waistband down once and cut three small slits through the folded edge. When unfolded, you get a patterned peekaboo effect.
- Hem crop. Cut the leggings to a 7/8 length (just above the ankle bone) and leave the edge raw for an intentional unfinished look. This also solves the common problem of leggings bunching at the ankle — check out our tips on keeping leggings from rolling down if that's an issue for you.
These quick wins are also a good way to test how a specific fabric handles being cut before you commit to a bigger design.
Warning: Avoid cutting directly on the seam line. Seams are structural — cutting through them weakens the entire garment and causes the leggings to fall apart within a few wears.
Fixing Common Ripped Legging Mistakes
Mistakes happen, especially on your first pair. The good news is that most problems have simple fixes.
You Cut Too Much
This is the most common issue. You got excited, the scissors felt good, and now there's more hole than legging.
- Patch from behind. Cut a piece of mesh or lace slightly larger than the opening. Hand-stitch or fabric-glue it to the inside of the legging so it shows through the rip.
- Layer up. Wear a contrasting pair of tights underneath. The rip becomes a design feature, not a mistake.
- Convert to shorts. If the damage is on the lower leg, cut both legs off at the same length and hem them into bike shorts.
Uneven or Jagged Cuts
- Re-cut with sharper scissors. Dull blades are the number one cause of jagged edges. Trim the uneven parts with fabric scissors (not household scissors).
- Embrace the raw look. Stretch the jagged edge with your fingers. The curling effect hides minor imperfections.
- Add distressing on purpose. Use sandpaper or a cheese grater to rough up the edges. It blends jagged cuts into an intentionally distressed aesthetic.
The Rips Keep Spreading
- Apply fray check or clear nail polish to both ends of every slit immediately after cutting.
- Wash on cold, gentle cycle, inside out. Hot water accelerates fraying.
- Never put ripped leggings in the dryer. The tumbling and heat will turn small slits into gaping holes. Air dry every time.
Fabric Curls in the Wrong Direction
- Most spandex blends curl toward the wrong side (inside) of the fabric. If the curl looks bad, try stretching the slit vertically instead of horizontally.
- If the fabric won't curl at all, it's likely too thick or cotton-heavy. Use a lighter pair next time.
Best Practices for Long-Lasting DIY Ripped Leggings
You've done the cutting. Now keep your ripped leggings looking sharp for as long as possible with these care and styling habits.
Fabric Selection
- Best fabrics for ripping: nylon-spandex blends (80/20 or 75/25). They curl cleanly and resist fraying.
- Acceptable: polyester-spandex blends. Slightly stiffer but hold up well.
- Avoid: 100% cotton or cotton-heavy blends. They fray unpredictably and don't give you that rolled-edge look.
Washing and Drying
- Turn inside out before every wash.
- Use cold water on a gentle or delicate cycle.
- Air dry flat — hanging can stretch the ripped areas.
- Keep them away from Velcro, zippers, and rough fabrics in the wash. Use a mesh laundry bag.
Styling Tips for Yoga and Beyond
- Pair ripped leggings with a solid-color tank or crop top to keep the focus on the legs.
- For yoga class, wear them during slower practices like restorative or yin. The cuts look great in seated and reclined poses.
- Layer over fishnet tights or brightly colored leggings for a festival or street-style look.
- Browse our leggings and yoga pants collection for pairs that work well as ripping candidates.
Storage
- Fold ripped leggings flat — don't ball them up. Crumpling stretches the cut areas.
- Store them separately from items with hooks, clasps, or rough textures.
Frequently Asked Questions
Can you rip leggings that have a compression fit?
You can, but cutting into compression fabric reduces the support it provides. If you rely on compression for muscle recovery or circulation during workouts, rip a non-compression pair instead. Cutting through compression panels removes the graduated pressure that makes them effective, so you'll lose the functional benefit even if the look turns out well.
What's the best way to rip leggings without scissors?
Use a sharp craft knife or box cutter on a cutting mat. Place cardboard inside the leg, mark your lines, and slice carefully along each mark. Some people use a seam ripper for small, precise holes. Avoid tearing fabric by hand — it creates unpredictable, uneven rips that are hard to fix, especially with stretchy materials.
How do you keep DIY ripped leggings from falling apart after washing?
Seal every cut end with clear nail polish or a product called fray check before the first wash. Always wash inside out on a cold, gentle cycle and air dry flat. Skip the dryer entirely — heat and tumbling are the fastest way to turn small slits into unwearable holes. A mesh laundry bag adds extra protection against snagging.
Final Thoughts
You now have everything you need to turn a plain pair of leggings into a custom, head-turning piece. Grab an old pair from your drawer — the ones with the small snag or the faded color — and make your first cuts tonight. Start with a single knee slit, seal the edges, and wear them to your next yoga session to see how they feel and move. Once you see how simple the process is, you'll never pay full price for pre-ripped leggings again.


About Susan T.
Susan T. is an internationally recognized yoga teacher who has spent years leading teacher trainings, workshops, and retreats around the world. Her work has been featured in Yoga Journal, Mantra Yoga, and the San Jose Mercury News, and she brings the same accessible, grounded approach to her writing that she brings to the mat — focused on what yoga actually does for real bodies and real lives rather than what it looks like in a photoshoot. At the site, she covers yoga tips and technique guides, gear and accessory reviews, and resources for practitioners at every stage of their practice.